I asked if we could feature her photo and she did one better...she wrote us a tutorial! Check it out below the cut. Also, Andrea is doing a little giveaway on her blog so visit before Thursday night if you're interested.
Now, here's Andrea:
Hello everyone!
I’m so happy to be your guest blogger … that sounds way too official for me, but I’ll go with it, just for today. A little about me … I’m first a wife and second a mom, my heart belongs to my Lord and He filled my soul with creativity. I have a BA in Graphic Design though I never used it formally. Instead I worked as a project manager for a national bank until I had my son almost 6 years ago. Since then I’ve enjoyed raising him up and having more time to create. Three years ago I started sewing and haven’t stopped since. Two years ago I started selling on Etsy to support my habit :). Last year I tried my hand at my local farmers’ market. And I’m sure this year holds greats things as well.
I love talking fabric and patterns and design and color … a nice big glass of iced tea and a fresh plate of cookies would make it perfect a perfect afternoon. I love seeing this resurgence of handmade goods and quality and value being placed upon them. The melding of an ‘old tradition’ with modern punches of color and perhaps a fresh look at traditional designs makes me oh so happy. Giving a handmade gift never gets old and is the reason my little pedal is to the metal (or carpet) almost every single day.
Thank you for letting me share a little with you … enjoy!
Modern Pinwheel Table Runner
By: Jodi Nelson (front) / Andrea Taddicken (back)
What you need:
1 Charm Pack {40 squares} – You will only need 16 squares
3/4 yd. Solid {Kona White} Fabric
1 Fat Quarter for Binding
Batting
The Pinwheels are made with 5" [charm] squares. 2 of each print for the pinwheel blades and 2 of each for the solid fabric.
All seams are 1/4"
Finished size - approx. 12” x 38”
Start Cutting:
From White:
1 - 5" x 44" strip (for pinwheels): Cut again into 5" squares
2 - 2.5" x 44" strips (for exterior sashing)
1 – 1.5" x 44" strips (for interior sashing)
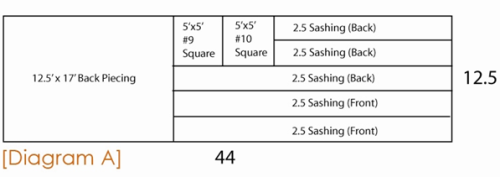
1 – 12.5” x44” strip (further cut according to Diagram A)
From 5” [charm] squares:
Choose 10 charm squares for pinwheel blades and your 10 solid squares: Cut in half diagonally
Start Sewing:
•Sew white triangles to print triangles, long sides together. Press towards print.
•Sew 4 of these squares to make one Pinwheel block. I pressed seams open when joining squares to eliminate bulk.

•Make 5 Blocks and square to 8 1/2" (using the center line to square).
•Add 1 1/2" x 8 1/2" white piece on two sides of Pinwheel block EXCEPT the last two [ends]. For example, block/1 ½” sashing/ block/1 ½” sashing/ block/1 ½” sashing/ block
•Sew 2 1/2" borders to each side then 1 on top and 1 on bottom.
** The above directions were borrowed, with permission, from the “Moda Bake Shop: Pinwheel Baby Quilt Tutorial” written by Jodi Nelson of Pleasant Home. **
Create backing by following Diagram B and the following instructions:
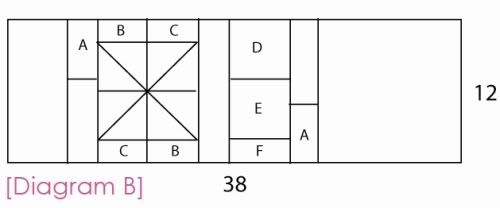
•Choose 6 more charm squares (to be “labeled” A-F)
•Cut charm squares A, B & C in half (you now have 6 – 2.5” x 5” strips)
•Sew both A strips to a remaining 2 ½” sashing piece
•Sew B & C strips together (2.5” x 9.5” strip), press seams. Center on remaining 5th pinwheel block and sew to the top and bottom of the block.
•Sew charm squares D, E & F together in a row
•Sew one of the A sashing strips to the D,E,F strip
•Sew one of the A sashing strips to the B,C Pinwheel Block
•Sew a strip of 2 ½” sashing to the other side of the B/C Pinwheel Block
•Sew the A/B/C Block to the D/E/F/A Block
•Sew additional widths of white solid on to each side to give you necessary length
•Press and trim backing
Quilt & Bind

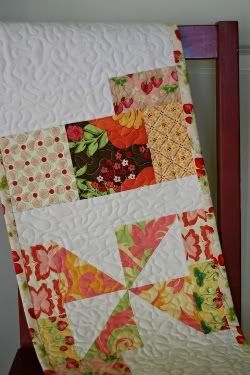
Table runner tutorial compilation & backing directions written by Andrea Taddicken of Knitty Bitties.
Click here to download a printable version.
Enjoy this tutorial for your personal use in making many happy table runners. Please do not distribute this tutorial/pattern without the permission of all parties. Thank you … Happy Creating!
http://www.pleasant-home.com/
http://knittybitties.blogspot.com/